Hey, my sweet friends!
Don’t you love when you can DIY projects and save some money and at the same time make something unique?
I do.
Many times we don’t need to spend a lot of money to make beautiful things for our home or even things we can use as gifts for family and friends.
After posting some projects where I transfer on wood or on glass, several of you have asked me if I could make a graphic tutorial … well, here it is!
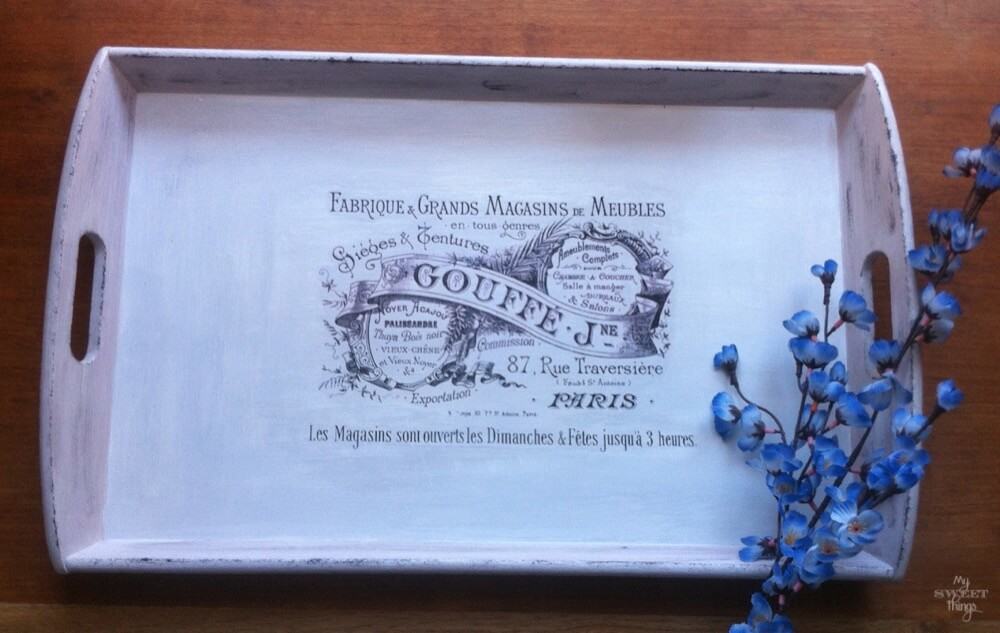
They said an image is worth more than a thousand words and I think the same 😉
You’re going to need the following. I will include some affiliate links for your convenience, you can read the full disclosure here.
- Sheet of paper
- Printer (laser best)
- Scissors
- Stick material (ModPodge, glue, paint, latex, varnish …)
- Object
- Cloth
After this, go to it! The first thing is to print the image or text you want backwards. This is an important step in case of text, believe me … It doesn’t matter if the sheet is new or recycled 😉

Cut it near the edges

Apply a layer of adhesive material on the printed side of the image. I’ve tried them all and they all work, though there are some I like more than others. If I have to choose, the best would be ModPodge, followed by white glue lowered with some water, and my least favorite is latex.

Then paste it into the object to decorate and press so that there are no air bubbles.

I use a plastic bag to protect the sheet while I press as it is wet and, therefore, delicate.

Let dry for at least 5-6 h.
Don’t be impatient, I know it’s so hard to wait…
This is why I usually do it at night because I have no temptation. Once it is dry, moisten a cloth and apply it to paper so that it will get wet. When it’s wet you will see the drawing at the background showing through.

Start to rub with your finger to remove the pulp of the paper. At this point I recommend doing it roughly, do not try to get the image sharp at once.

When you see the whole image, it’s time to do something else while the paper dries again, like drinking a tea or coffee. A few minutes is enough.

Back to work again, and now you can remove all remaining cellulose. Don’t ask me why, I’m sure it has some explanation, but those minutes between rubbing help the image to fix really well.

As you can see it is clear, and you do not need to spend money buying special products. You can protect it with varnish or wax, which you like most.

Isn’t it simple? Would love to hear your opinion and see your work if you try it, come on, don’t be shy !!
Hugs,
Pili


Do you love DIY, recycling, home decor, furniture transformation and all kind of crafts? Then we have the same passion! I would love to share all my crazy ideas and projects with you so I would love if you SUBSCRIBE for my post e-mails.
I also share interesting content on Facebook and other social media, and I would love to hear from you! Not following me yet? Don’t be shy and stop by to say hello. Follow me on FACEBOOK, PINTEREST, INSTAGRAM, TWITTER, +GOOGLE.
Featured at:


Pili, this is a great tutorial. I will definitely have to try this. It looks so pretty when it is done.
You can do wonders with this, Mary. And you don’t need anything special, just adhere the paper when the paint is still wet and let it dry. It works too!
Perdón….!!! Las transfer las compras o las consigues en alguna pagina en concreto?????….Soy novata en esto…¿se nota verdad???
Hola Isabel. Tranquila, alguna vez hay que empezar… Lo primero comentarte que tienes esta misma entrada en español, y seguro te resulta más sencillo. La verás aquí: https://sweethings.net/como-hacer-transfer-sobre-madera/ Todas las entradas las tienes en ambos idiomas, verás una banderita justo encima de mi foto para cambiar de uno a otro 😉
Los transfer no son nada más que hojas que tu misma imprimes; si ves una imagen en internet que te gusta, pues esa es la que puedes hacer servir para hacer el transfer. A partir de que tengas la imagen, sólo tienes que seguir el paso a paso del tutorial.
Espero haberte ayudado, gracias por pasarte por mi blog!
Hi Pili! I’m stopping by again to let you know that I nominated you to my monthly Shout Out Saturday post.
I’m adding you to a group Pinterest board and you can collect the featured button on my site.
Thank you for sharing great content!
I’m so honored you chose me for your Shout Out post! Really glad to be able to share all I do with other readers.
Thank you so much, Debbie!
Hola Pili! You’re so creative, I’ve always wondered how to do this! I’m so glad I found your blog. Thanks for sharing!
Thanks Monica! Now you know how it’s done 🙂
Glad you stopped by!
Pil my best buddy I am nominating you for the Blogger Recognition Award, because I want you to know I appreciate your support and friendship. You do not have to accept this award but if you do I will be posting about it Monday. Thanks for all your support.
Mary, of course I accept the award. I’m honored you thought of me, and I’m really glad and thankful to have met you. Many thanks
Thank you! Thank you! I have a few Christmas gift ideas and this is just the trick I was looking for to finish them off! I will be sure to give you a shout out when I complete them!
I love to hear that, Tanille! Look forward to seeing them 🙂
Thanks for stopping by, I really appreciate you taking the time to visit and comment
It is simple Pili! I wanna try! Great tutorial, step by step, as I also didn’t know you would just rub it off! Thanks!
Yes Katrin, can’t be simpler!! You’re welcome!
I’ve been wanting to try some transfers on wood and glass but I don’t have a laser printer. Next time I need a printer I will make sure it’s a laser. In the mean time I should check and see what type of printers we have at work. Thanks for sharing your tutorial. Pinning!
Hi, Linda! Thanks for stopping by! I really love laser printers, they are faster and the cartridge last much longer that an ink one. Companies usually use laser printers.
Oh wow…this is so neat! I had no idea this could be done!
Thanks for joining Cooking and Crafting with J & J!
Yes, Jess, really easy! I appreciate your visit!
I have been wanting to try transfers for a while but have been too chicken to try it. This great tutorial makes it not so intimidating! Thank you for sharing it! Well done! I would love it if you would share this as well as any other makeovers you have done at my Making Broken Beautiful party this week. It runs every Thursday thru Sunday. I do hope you will come and inspire others! http://thecuratorscollection.wordpress.com
Have a great week!
Smiles!
Terry
Hi, Terry! It’s really fun to do, don’t be afraid and give it a try! I would love to stop by, thanks for the invite!
Have a wonderful week!
It looks amazing and the process is not at hard as I would have imagined. Well done x
Hi, Anea! Not hard at all!! Thanks for stopping by!
That’s awesome! I am so bookmarking this tutorial….so many things you can do with this!!
Who knew it would be so simple….other than the pain of waiting of course!
Thanks for linking up to Marvelous Monday on Smart Party Planning.
Great, Catherine! Then you will have it at hand when you need it. You can do lots of things with it!
Hugs
I can’t believe how simple this is. I would have been down hobbycraft buying the most expensive things possible to make it look only half as good. It’s as simple as any paper. Wow! I feel a bit inspired now. Thanks for sharing this on #LifeLovingLinkie I’m sure others will be amazed at how simple this is too (or perhaps your crafty skills make this look easy!!!)
Sally @ Life Loving
Hi, Sally! It’s not my crafty skills, it’s easy indeed if you follow the steps, specially those about waiting which are the hardest 😉
Thanks so much for stopping by!
That is quite amazing, I have never seen that before. Thanks for the tutorial, it does not look too hard at all.
If you love Pinterest I would like the pin to this post in The Pinterest Game. There are 3 random winners each game who get FEATURED the next week, all players then re-pin the winners. New Game Live in 5 hours.
http://60-thenew40.com/the-pinterest-game-17a/
Many thanks, Katherine! You’re right, it is not hard at all!
Thank you very much for stopping by!
I think we got accustomed to having everything done for us because of our lack of time. We forgot that we can still get things done without spending lots of money.
Thanks for this awesome addition to #tiptuesday.
I agree Debbie, there’s no need of buying things just to get rid of them once we are tired.
Thanks for stopping by
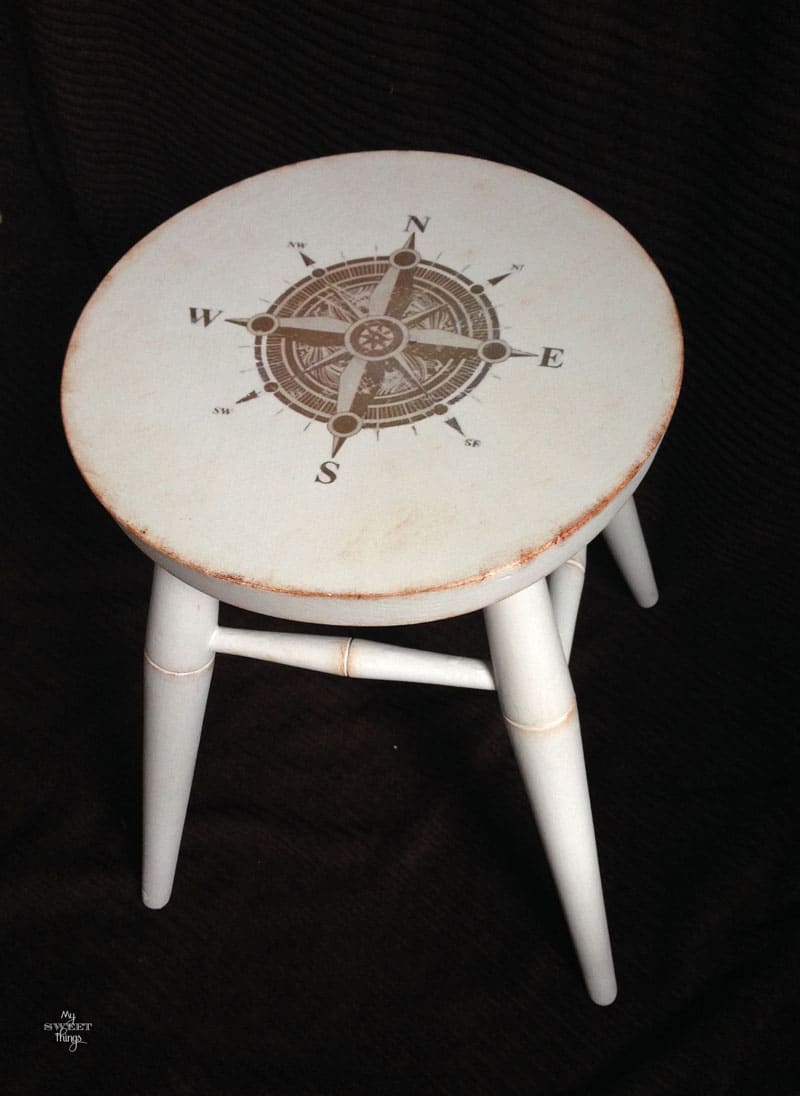
I had heard this was easy, but I didn’t know how easy! And I always assumed it required some sort of special tools or supplies. My kids have a wooden stool that I think needs our last initial!
I’m hosting a link party I’d love for you to stop by and link up with us! http://winsteadwandering.com/the-alder-collective-link-party-no-4/
Many thanks, Abby! Have a great week!
love this idea, thanks for sharing it on Dream Create and Inspire. I’m going to do it on some wood i have.
Maria
Glad you find it useful, Maria 🙂
Pili:
I have ALWAYS wanted to do this for personalized decor in my living room… Can I tell you a secret I’ve never bought or played with modge pod… Now I have the sudden urge. Thanks lady !!! And thanks for sharing this over at #LFEO 🙂 Have a great weekend !
There are a lot of things you can do with this technique, once you try it lots of possibilities will come into your mind. Thanks for visiting, Amanda!
Thank you for the great tutorial. I am definitely going to try this on a little wooden box I picked up.
You’ll see it’s so much fun! Then you won’t stop thinking about new projects to do with it
Thank you so much for sharing your post with us at the #AnythingGoes Link Party! The new party goes live today at 6 PM ET.
You’re very welcome, Sandy!
Thanks so much! I love the step by step, I need all the help I can get! LOL I will be trying this, perhaps for a Christmas gift, I’ll have to think on this. But my daughter loves Dr. Who and I could do something really cool for her room. She loves it when I make things so that she has different things than all her friends!!! Thanks! Pinning!
That’s the best thing about handmade Nikki, no one else has what you have. I’m sure she will love if you make something special for her. My daughters are my biggest fans, and they promote me among her friends and others parents lol
Good Evening Pili! Just popping in to let you know your post has been picked as a feature at the Welcome Home Wednesday Link Party! Stop by tomorrow morning to see your feature and link up! Don’t forget to grab your “Featured Button” too!
Many thanks, Lisa!! I will stop by later today 🙂
Great tutorial. Very clear and easy to follow. Thanks for sharing at Your Inspired Design Link Party #9.
I tried to make it easy to follow, so everybody can give it a try. Thank you so much for stopping by Carol
I’ve never tried this method, will need to try this soon. Thanks for the tut! Thanks for sharing at Your Inspired Design.
I would love to see what you do with it if you finally decide to try. I really appreciate your visit
Great tutorial Pili! Thanks for linking up at Your Inspired Design Link Party!
I’m really happy you found it useful, Christine. Thanks for the feature!!
Thanks for sharing that Pili!
It’s super helpful. I’ll be using that technique in the future.
Pinning !
You’ve been featured this week at Idea Box:)
http://milaslittlethings.com/2015/11/idea-box-thursday-link-party-35.html
xx
Mila
That’s great, Mila, you just made my day!! I really appreciate you stopping by to tell me, and I’m really glad you found the tutorial useful
What a great tutorial. I’m going to need this so I pinned it.
Glad you find it useful, Susan!!
Thank you for sharing with us at #JoyHopeLive!
Thanks so much for hosting, Mary!
I still haven’t gotten around to trying this, but it is on my list of things to try. You make it look so easy! Now all I need is a laser printer.
You’ll see it is really easy, Linda. If you have a copy shop around they can print it for you
Cam you make the tekst without a photo/Copy shop.? I have a printer myself modtog for this reason.
Hi Maria
If your printer is a laser one you can. If it is ink then it is not suitable.
This is such a great tutorial! The pictures are really helpful to see the process. I don’t have any plans to transfer onto items right now. But, I can imagine some awesome crafts to make for my friends with this tutorial in the future! Once it’s yardsale season again I’m sure I’ll be picking up some wooden items to do this with. 🙂
These are difficult dates around Christmas, but I’m sure you will make great crafts using it. Let me know if you make one, I would love to see it
What a great tutorial. I love that it doesn’t involve anything that I don’t already have around the house, and your pictures make it look so easy. I can’t wait to give it a try.
Yes Jessica, that is one of the best things, you can use anything you already have on hand
Hi Pili, This is very creative work, it looks like an easy job, but i know it is not easy, I am going to try soon.
Mary Christmas and Happy holidays.
Sadhna, it is not difficult at all. You just need to keep the drying times, and then be gentle when scrubbing, that’s all.
Thank you so much for stopping by, I really appreciate your visit.
Pili:
Will printing in color on a laser printer yield good results in the color selected?
Hi, Brenda. It really depends on how big the design is and the quality of the print. I found that small prints at home turn out quite good, but for bigger or detailed ones I prefer to be made in a copy shop. Or, you can choose a design and try it first on a piece of fabric you don’t need.
I would love to hear your feedback on this.
Hello, how do you get your printer to print backwards?
Thanks!